U.S.S. Enterprise NCC-1701 (2285)
U.S.S. Enterprise NCC-1701 (2285)

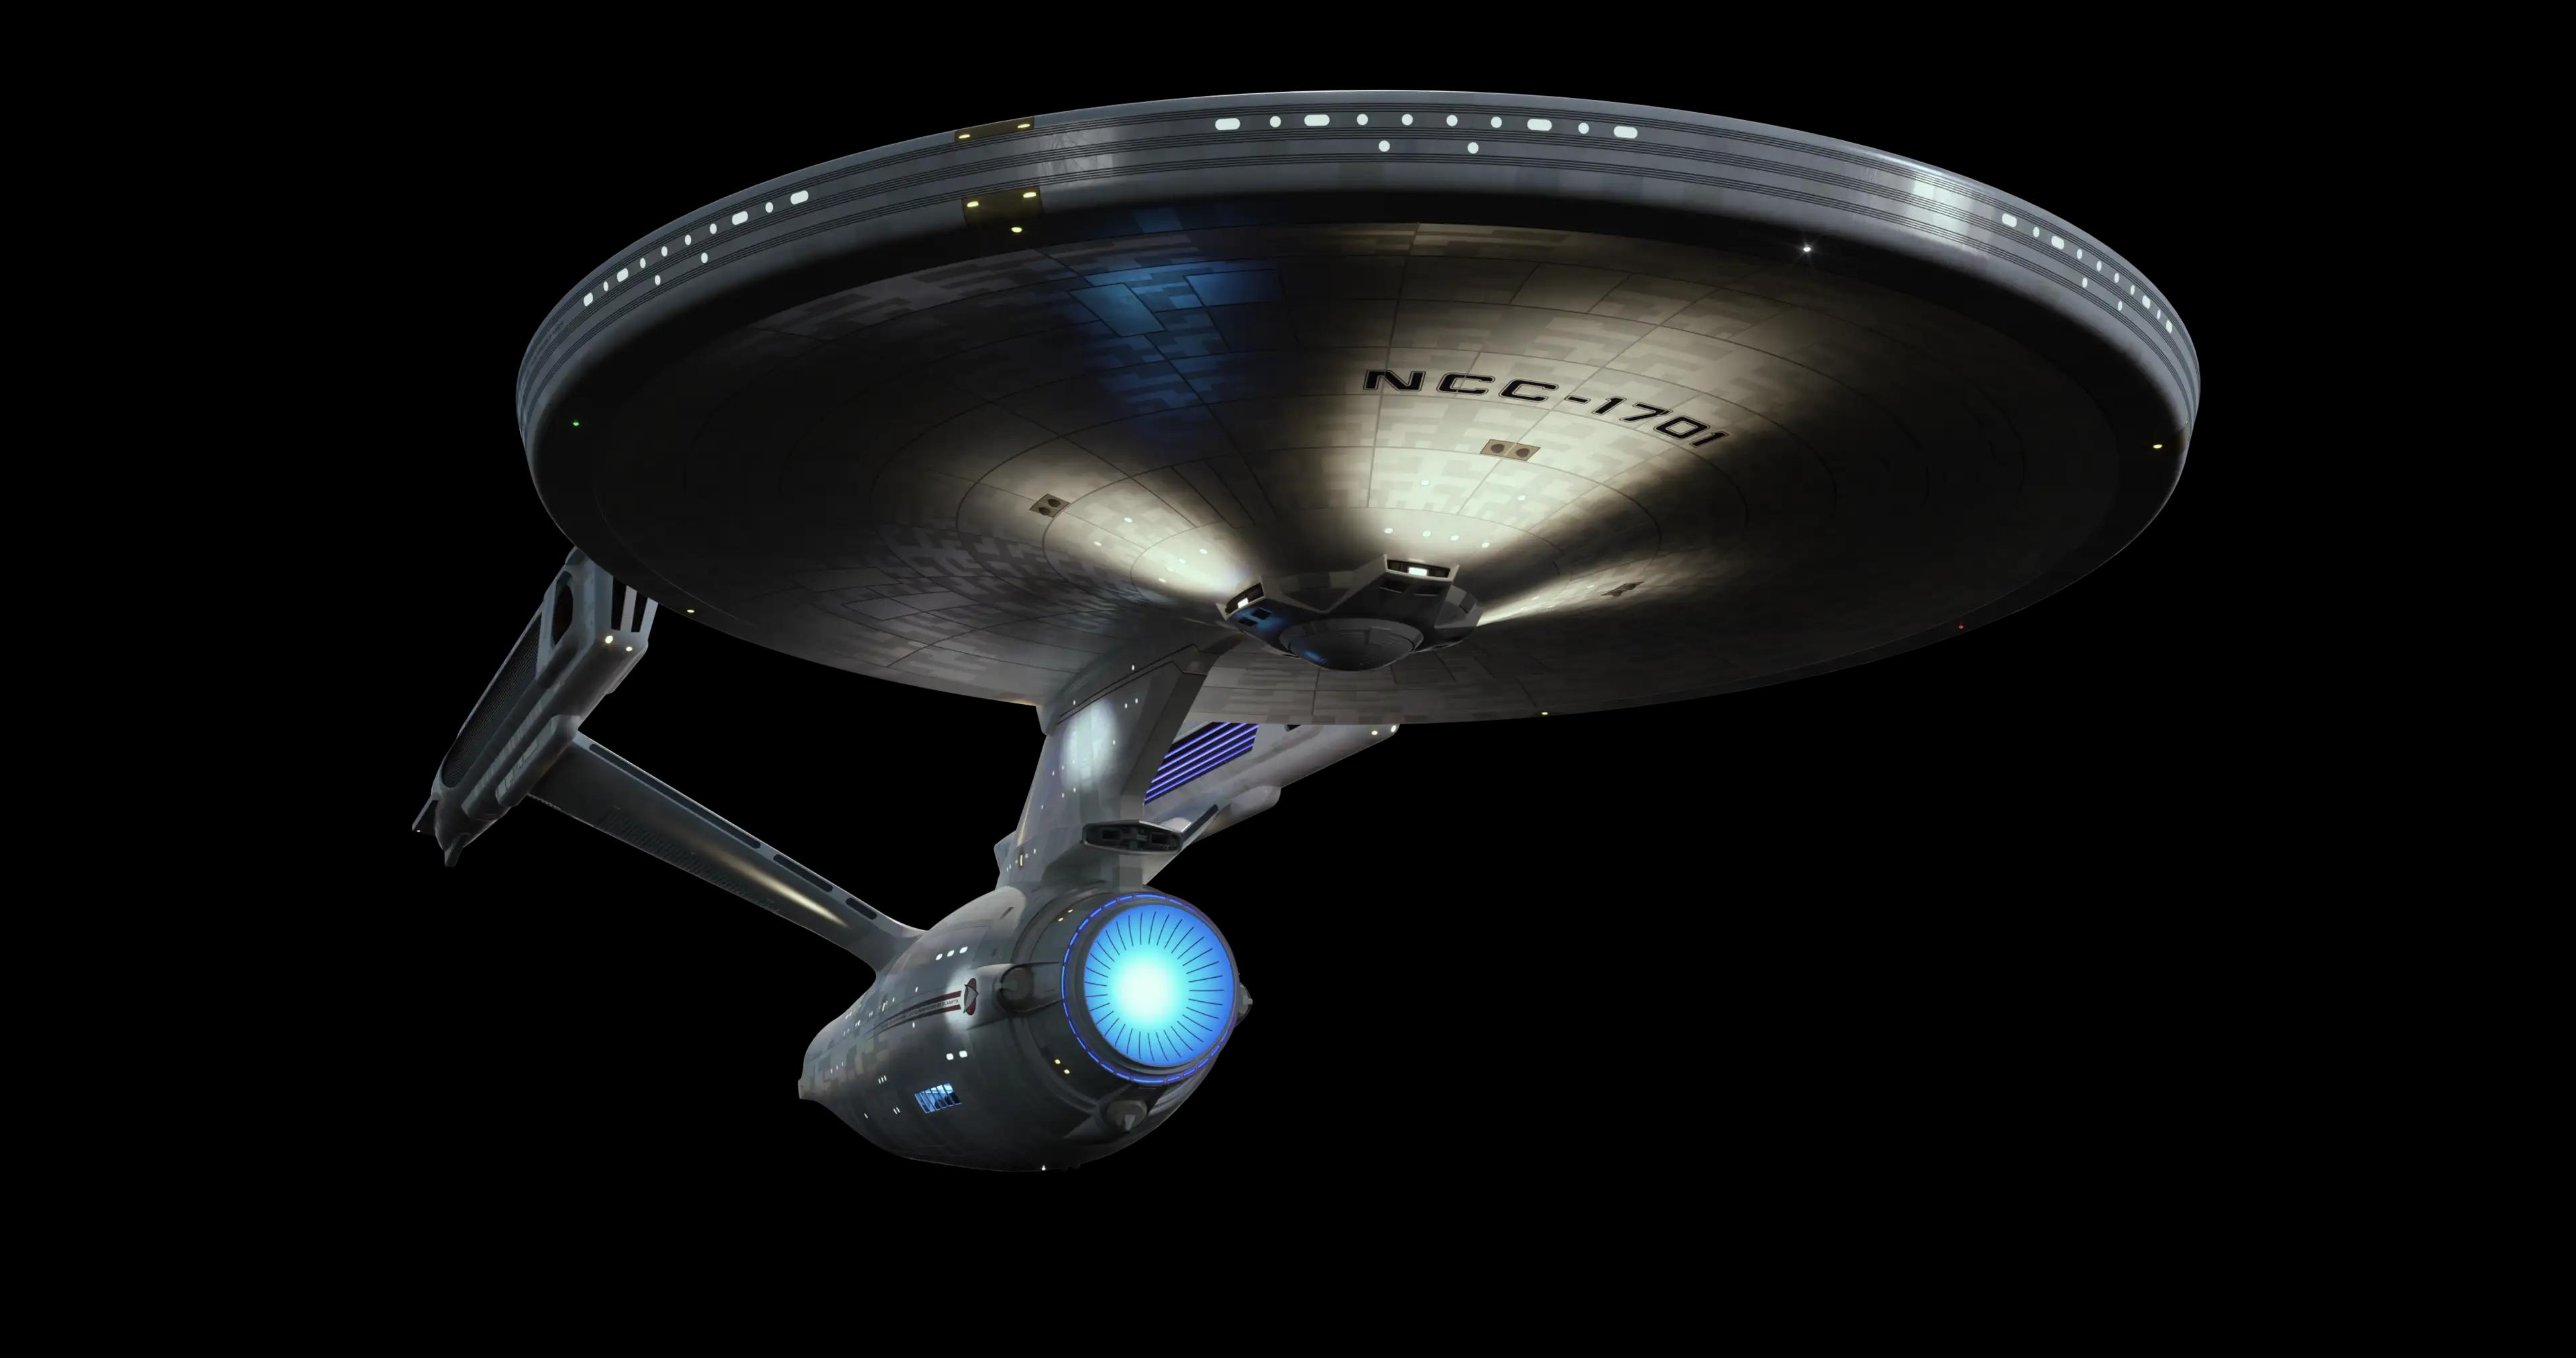
While on a training mission in 2285, Admiral James T. Kirk took command of the Enterprise from Captain Spock to respond to a distress signal from the Regula One scientific research laboratory overseeing Carol Marcus’s “Genesis” experiment. The Enterprise came under attack by the hijacked U.S.S. Reliant, under the command of Khan Noonien Singh, an exiled tyrant from the 20th century Eugenics Wars who sought revenge on Kirk.
U.S.S. Enterprise NCC-1701 Bridge | A Deck (2285)

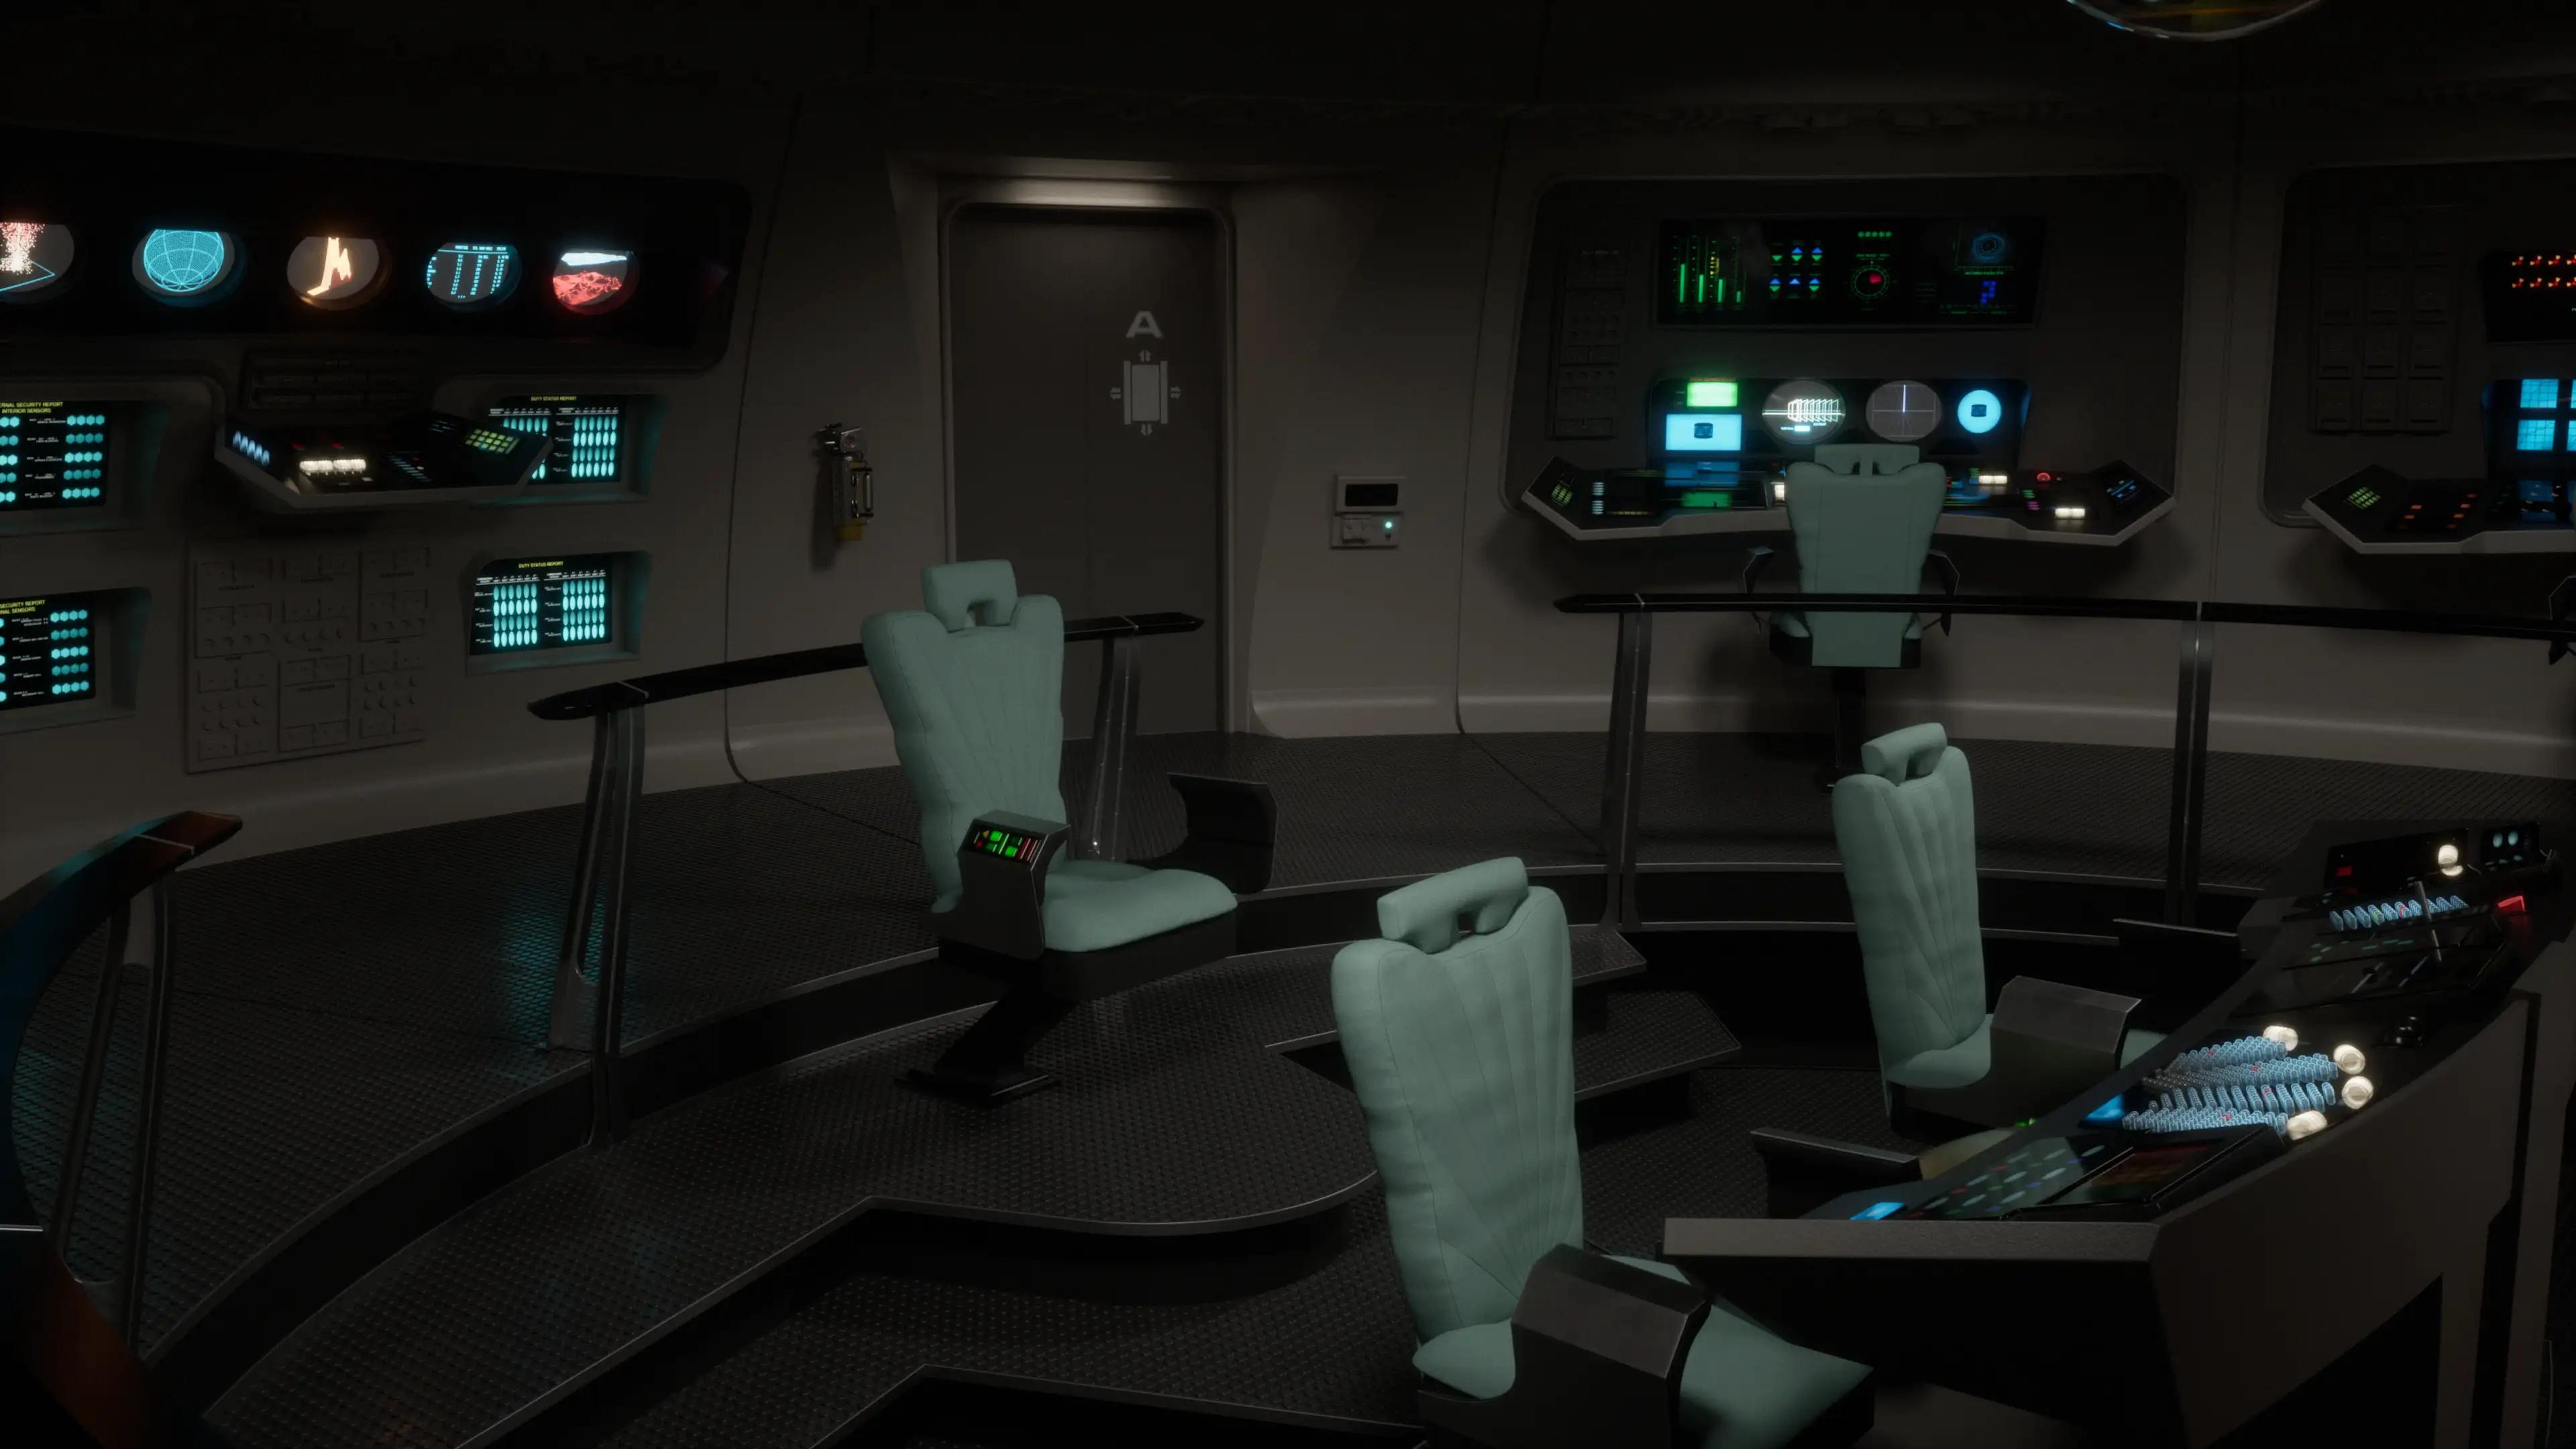
The bridge of the Enterprise bridge in 2285 remained true to the solid design of its predecessor, with the captain’s chair and helm console in a recessed command pit, the main viewer at the fore, turbolift access to aft, and stations for science, communications, engineering, and others surrounding the perimeter. However, sometime prior to 2285, the bridge of the Enterprise was given a minor upgrade; some stations were relocated to different positions to better accommodate the captain’s view of vital stations, namely the science station.
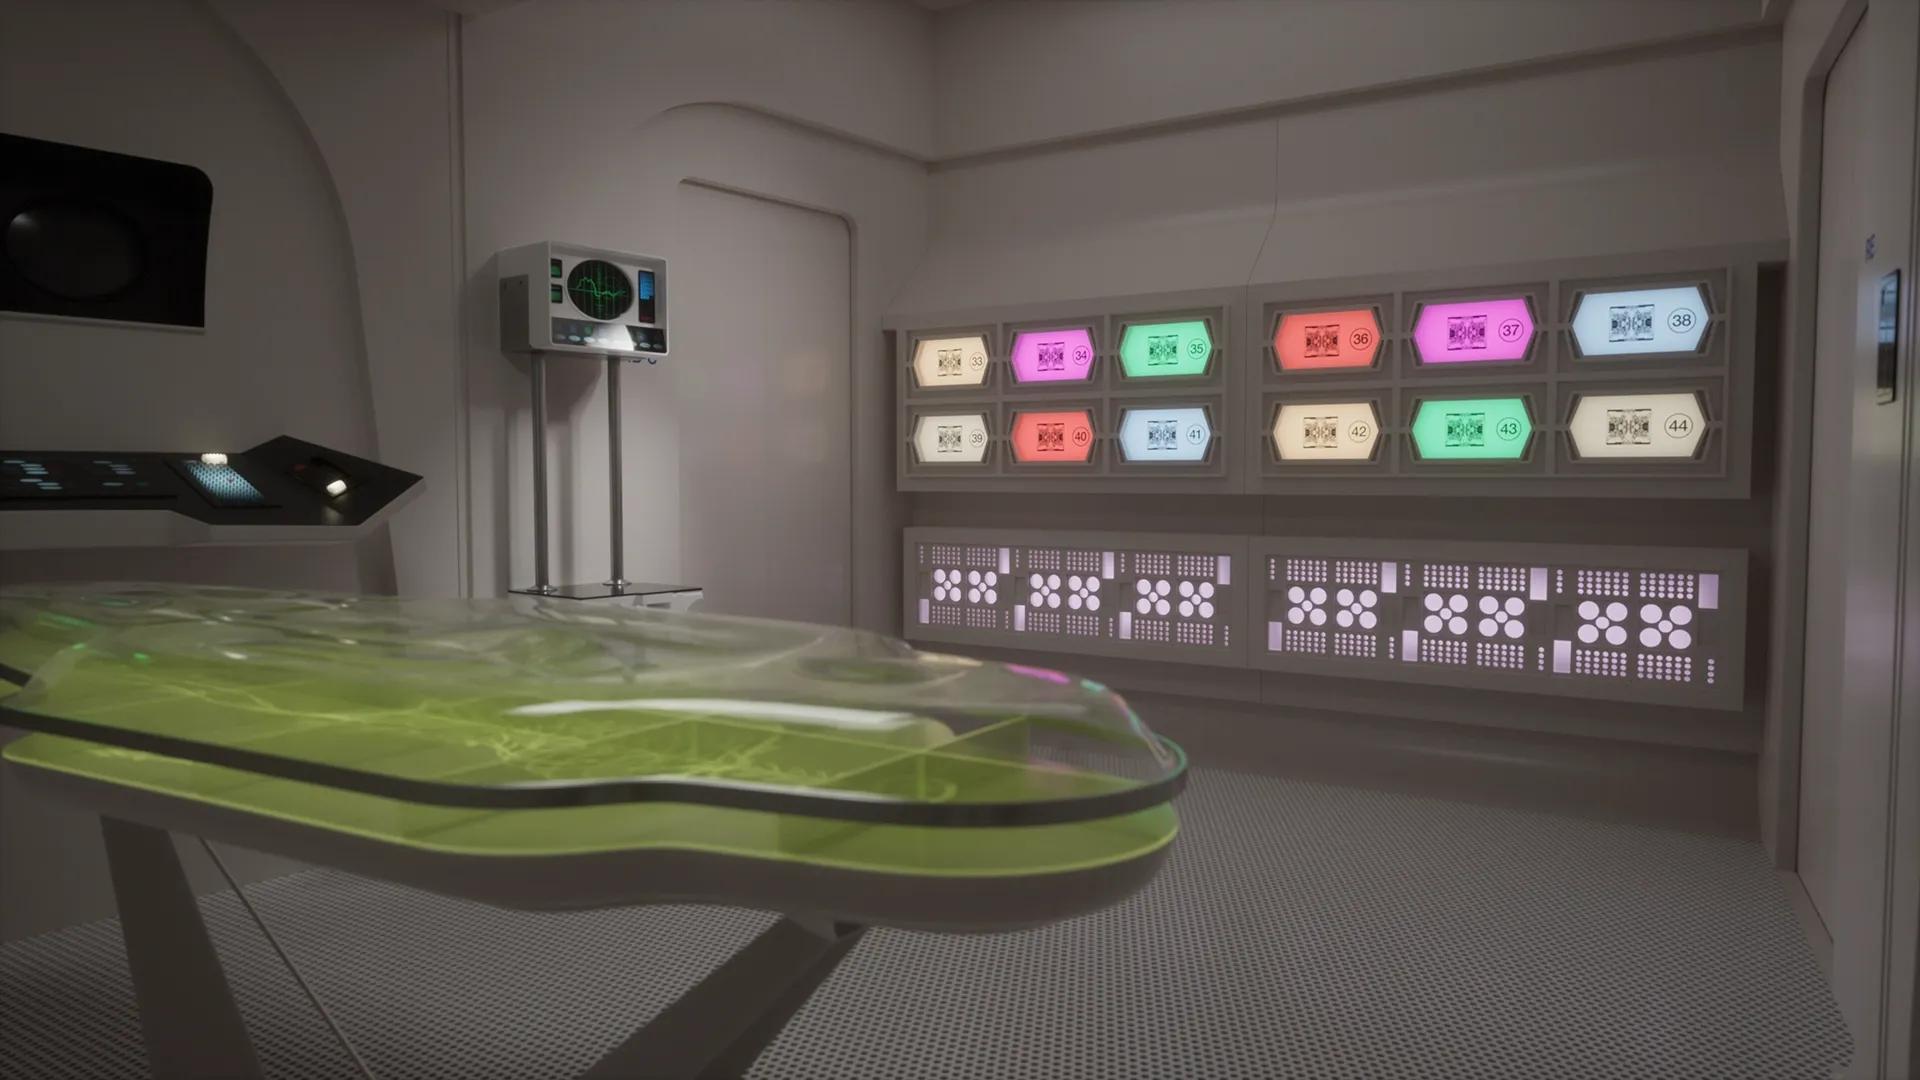
U.S.S. Enterprise NCC-1701 Sickbay | G Deck (2285)
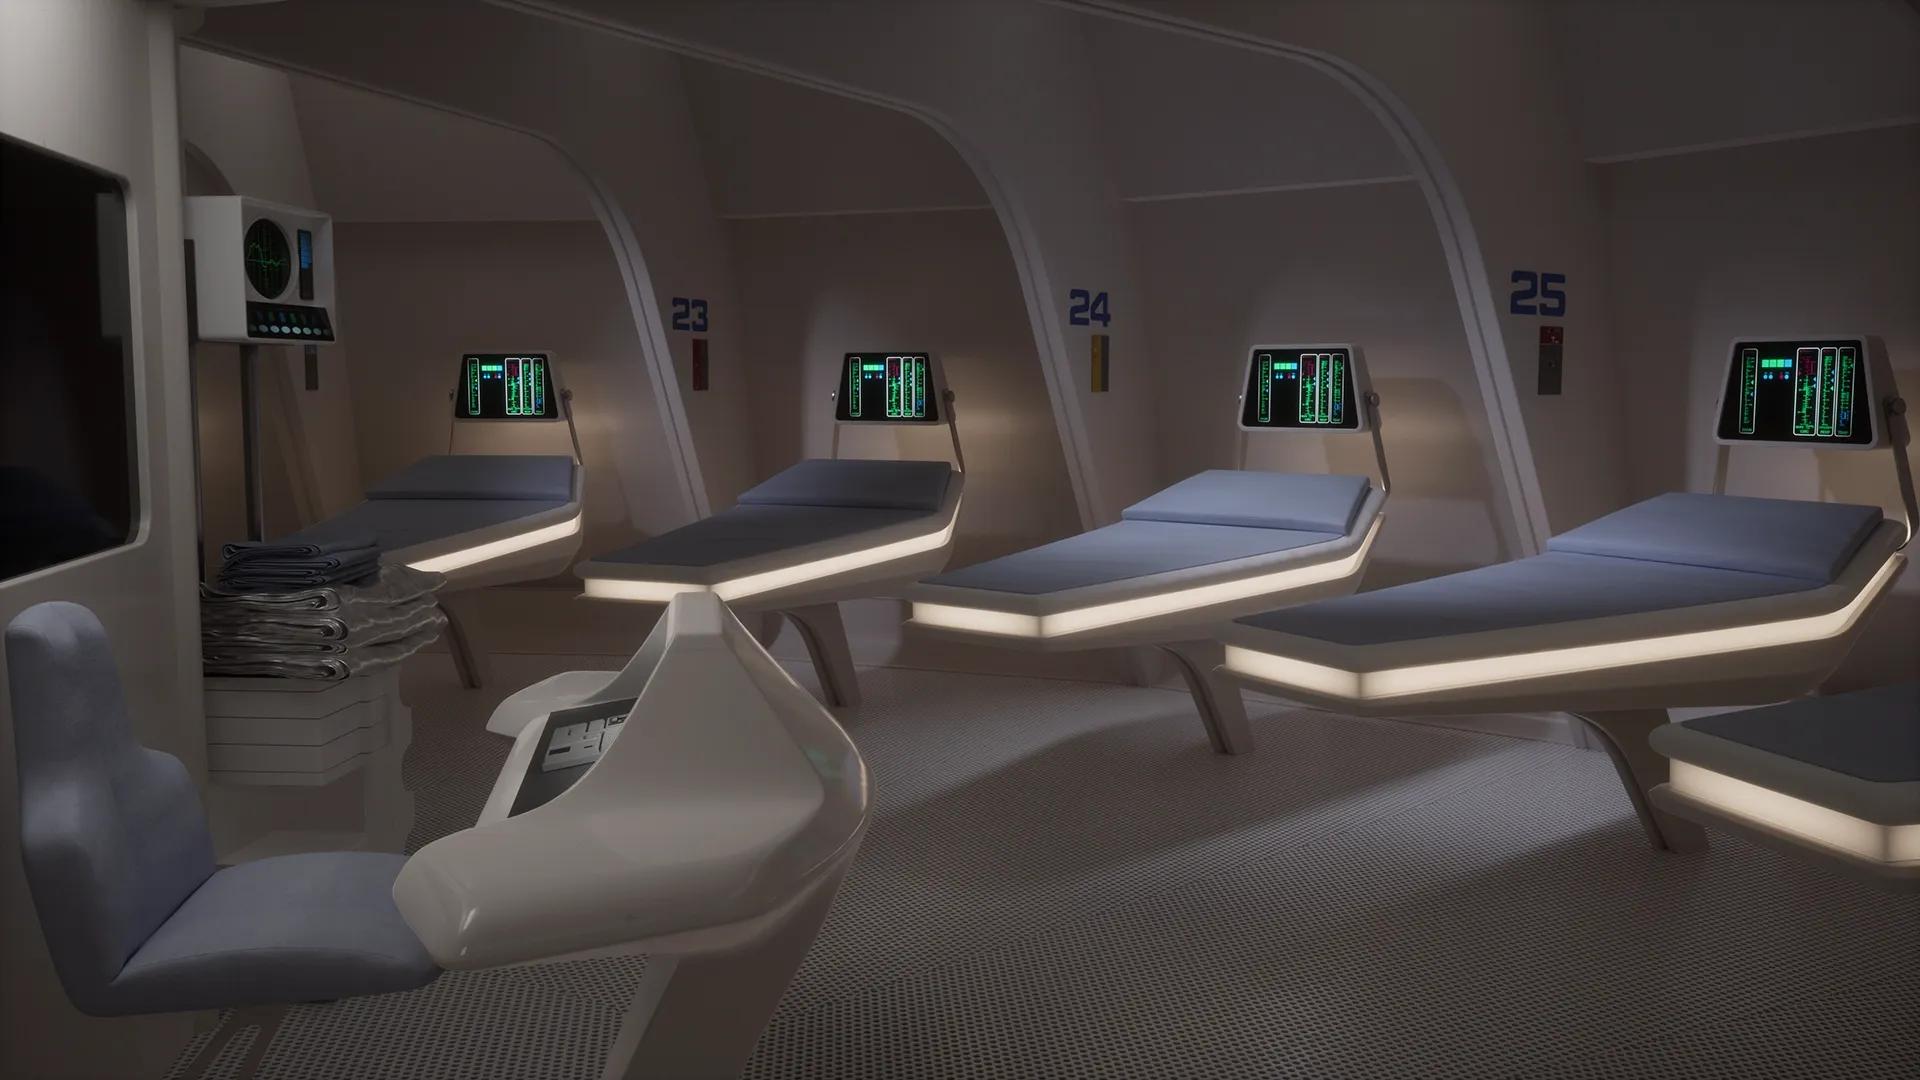
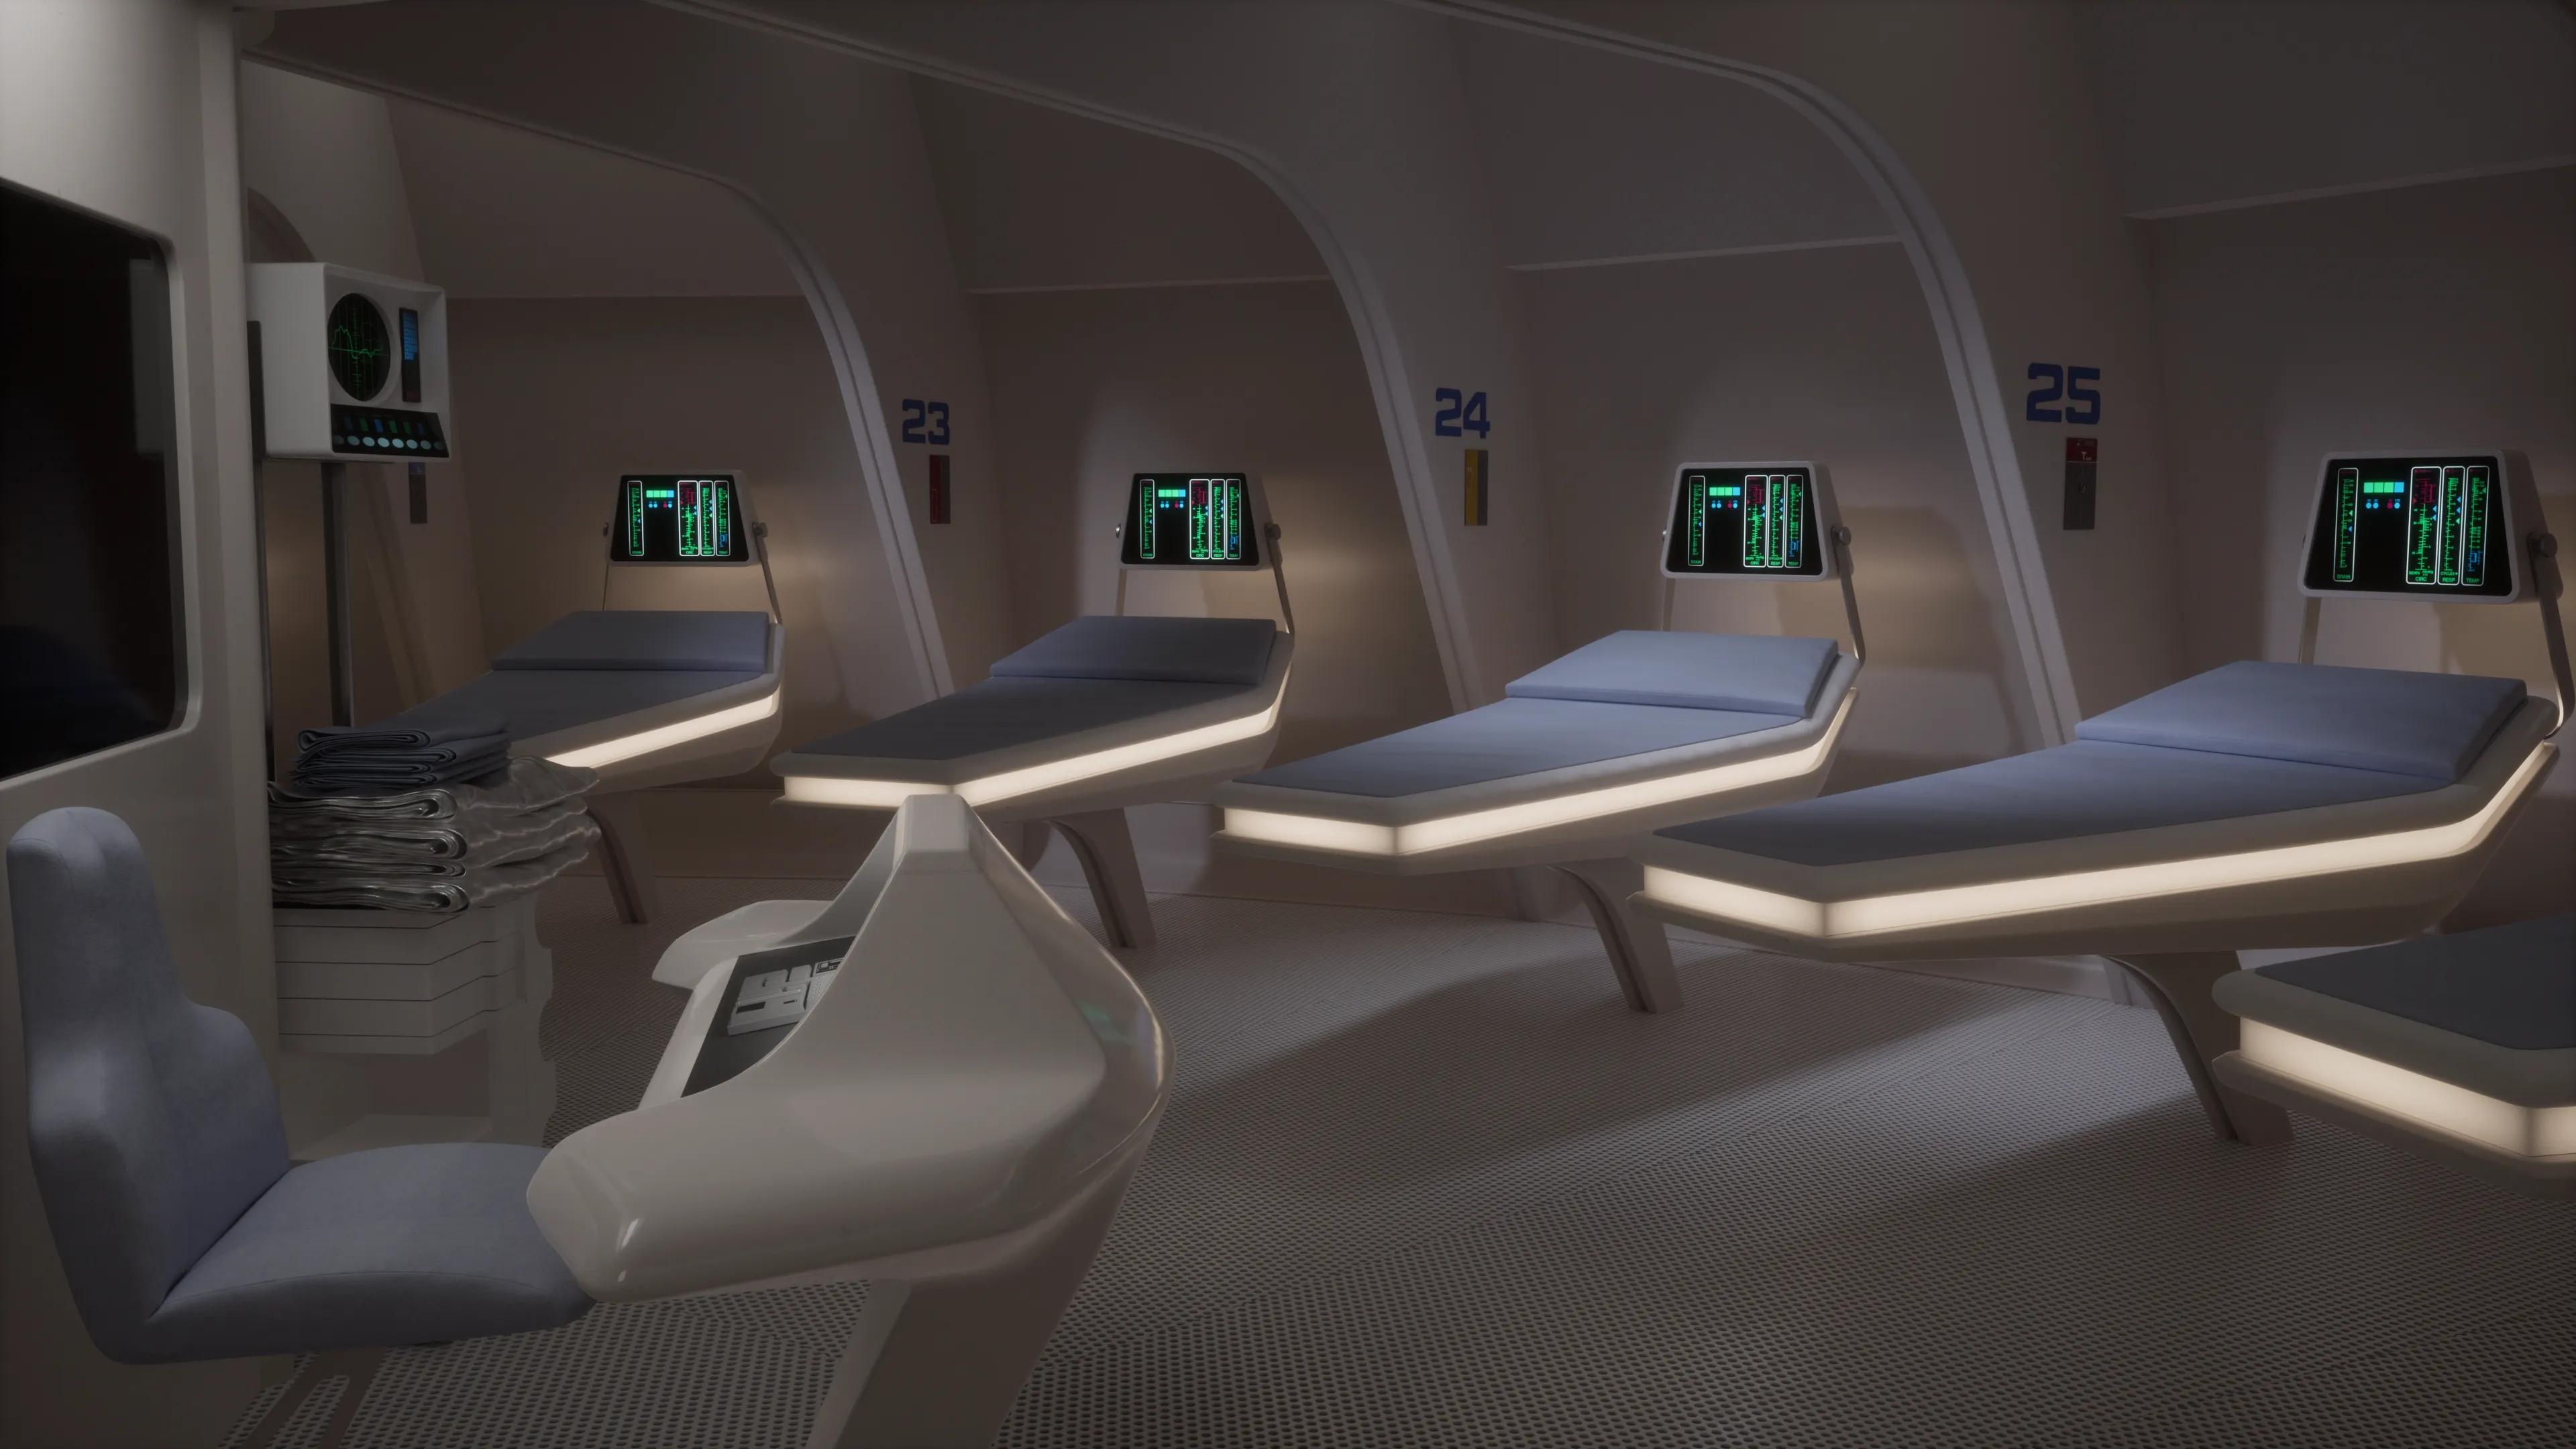
The upgraded sickbay complex of the refitted U.S.S. Enterprise formed an aft half-ring near the center of G Deck. It consisted primarily of an intensive care ward, an examination room, and a combined doctor’s office and laboratory, among other medical facilities. In addition to treating injuries and illnesses a crew member or other person might sustain, the area was also used for analysis of new lifeforms a starship might encounter, as well as developing treatments for unknown diseases or illnesses. The examination room itself contained a micro diagnostic table, which was capable of fully analyzing parts of an organism or humanoid body at the sub-cellular level.
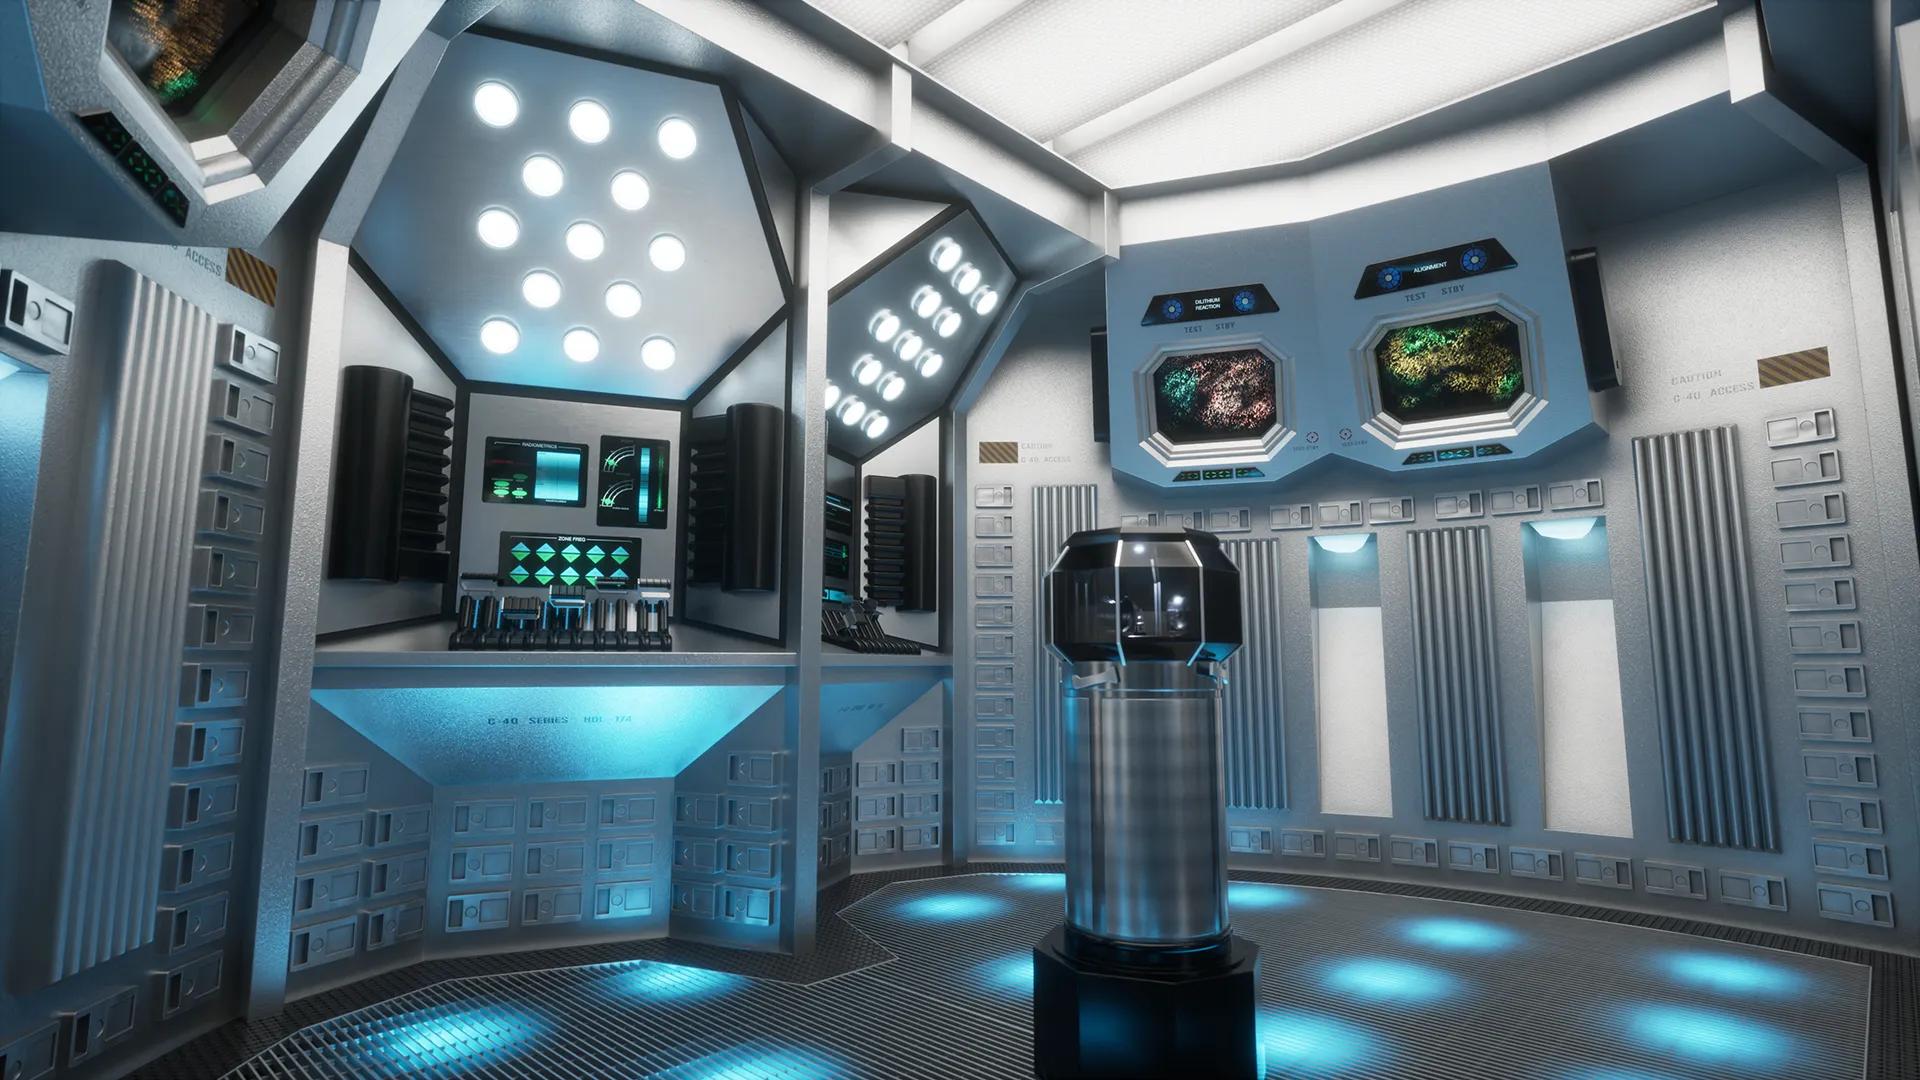
U.S.S. Enterprise NCC-1701 Transporter Room | G Deck (2285)

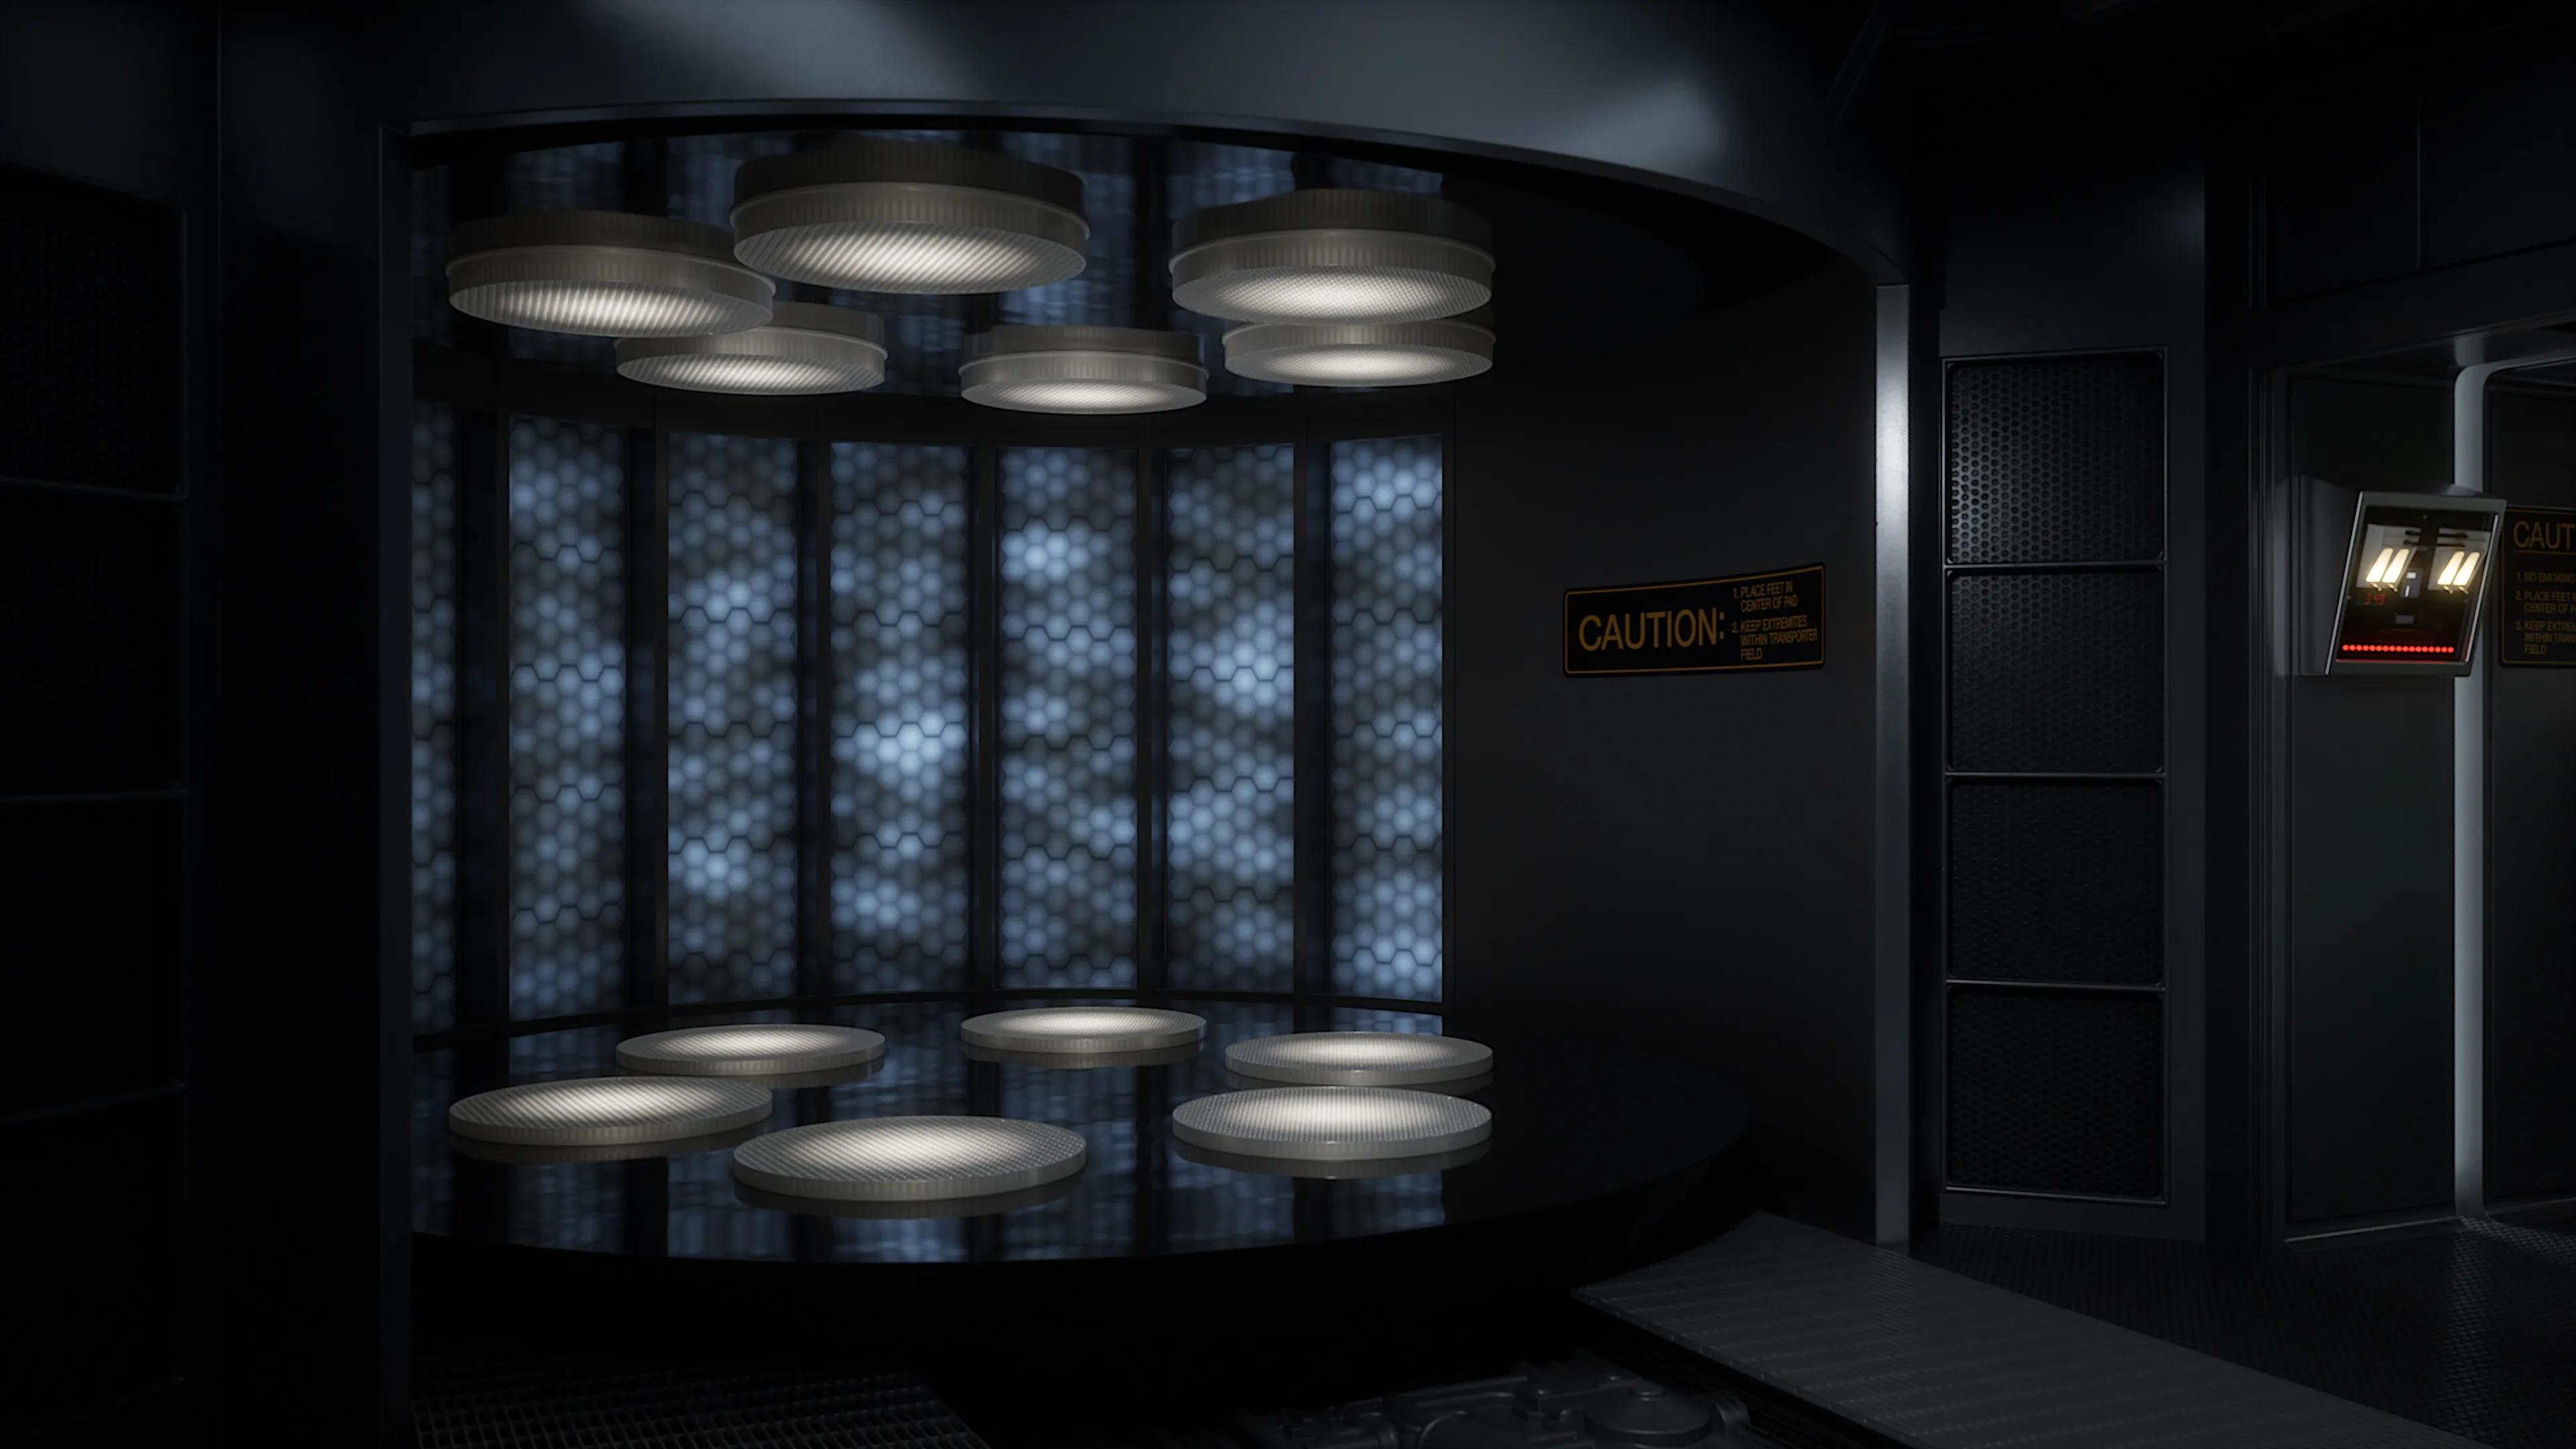
Located on G Deck in the primary hull of the refitted U.S.S. Enterprise, the transporter room was used to convey crew and equipment short distances for landing party missions, crew transfer, and resupply. The transporter employed quantum-resolution matter/energy conversion transportation technology. A more powerful transporter system installed during the ship’s refit required that the transporter operator stand within an enclosed control pod, which had a floor-to-ceiling transparent aluminum panel through which the operator could view the transporter platform.
U.S.S. Enterprise NCC-1701 Main Engineering | O Deck (2285)
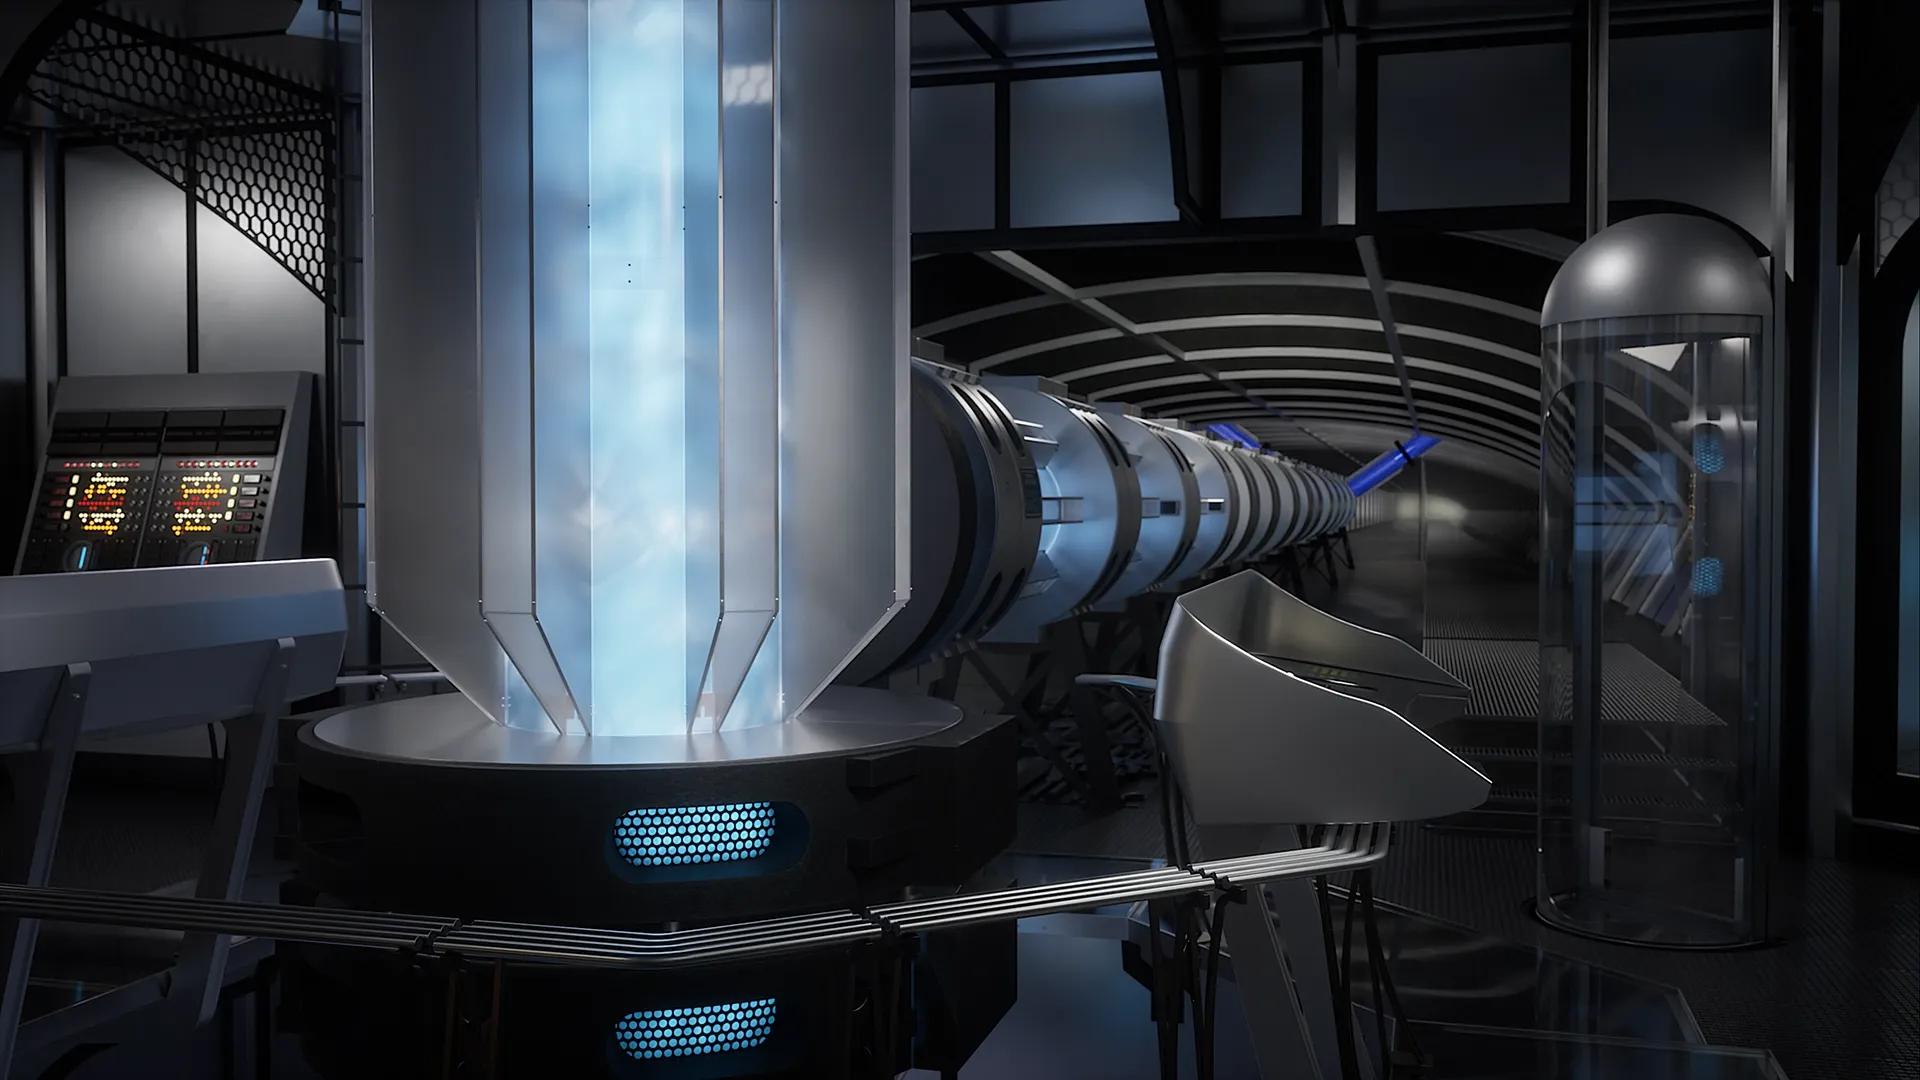

Located on O Deck in the secondary hull of the U.S.S. Enterprise after its major refit in 2271, main engineering was from where the ship’s warp and impulse engines were controlled. Located in the center of the room and extending many decks above and below was the vertical warp intermix chamber, which provided operational power for the impulse drive system and furnished enough additional energy to power all other shipboard systems. Extending aftward from the vertical shaft was the horizontal chamber which drew from the same pool of matter/antimatter fuel and branched out to provide energy to the port and starboard warp nacelles. Surrounding the intermix core were two one-man lifts and a ladder which provided access to the engine inspection areas on the decks above and below. A newer addition to the room, installed sometime prior to 2285, was the dilithium reactor room, from which the reaction of the dilithium crystals could be monitored and controlled. This room was shielded from the rest of engineering via a transparent partition.
PRODUCTION INFO
Ship Model (Physical)
As portrayed in Star Trek II: The Wrath of Khan (Film, 1982)
The U.S.S. Enterprise miniature was 8’ long and constructed by Magicam for Star Trek: The Motion Picture. The design utilized ideas from Matt Jefferies’ Star Trek: Phase II drawings. Abel and Associates art director Richard Taylor and illustrator Andrew Probert worked on the final design. The filming miniature was mostly unchanged from its previous appearance, although some of its pearlescent paint scheme was dulled down due to difficulty photographing the model against a bluescreen.
Bridge Set (Physical)
As portrayed in Star Trek II: The Wrath of Khan (Film, 1982)
The bridge of the U.S.S. Enterprise in Star Trek II: The Wrath of Khan was essentially the Star Trek: The Motion Picture bridge with an overall darker lighting scheme and swapped bridge stations. The film-projected displays were replaced by 24 fps video monitors, and teal slipcovers were used to economically change the design of the bridge chairs. This version was supervised by production designer Joseph R. Jennings, who had previously been in charge of the bridge when it was originally built for the abandoned Star Trek: Phase II series project.
Sickbay Set (Physical)
As portrayed in Star Trek II: The Wrath of Khan (Film, 1982)
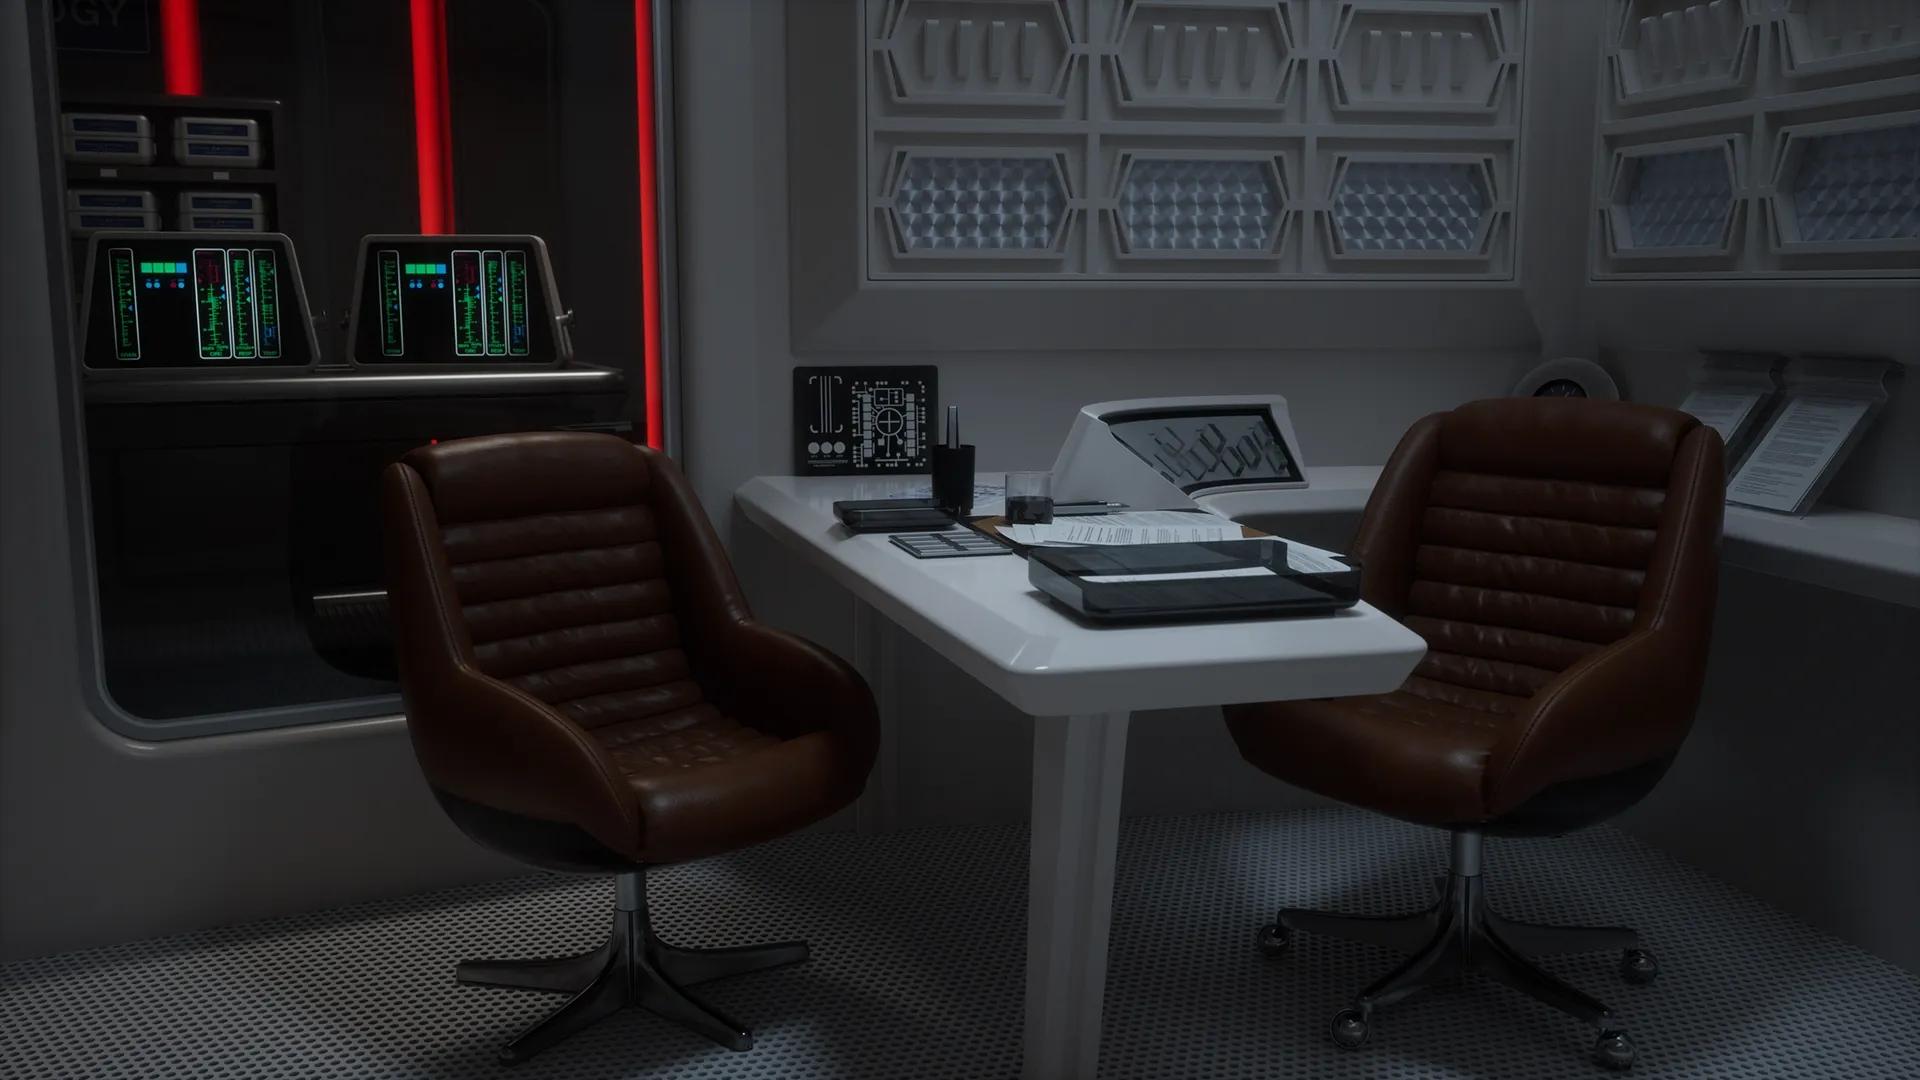
The sickbay of the Enterprise seen in Star Trek II: The Wrath of Khan was slightly redressed from its appearance in the previous film, Star Trek: The Motion Picture. Modifications included more signage, identifying numbers and data slates affixed to the dividers between each of the biobeds in the intensive care ward, and a clutter of objects on Doctor McCoy’s desk, including a mess of paper documents most likely reflecting the doctor’s disdain for computers.
Transporter Room Set (Physical)
As portrayed in Star Trek II: The Wrath of Khan (Film, 1982)
The transporter room of the U.S.S. Enterprise was seen only briefly in Star Trek II: The Wrath of Khan, and was only slightly redressed with additional detail from its previous appearance in Star Trek: The Motion Picture. The dazzling light display seen at the rear of the transporter chamber was achieved by shining lights onto a spinning mirrored “disco ball” behind the set, which then cast several rays of reflected light onto the diffused backlit “honeycomb” panels
Main Engineering Set (Physical)
As portrayed in Star Trek II: The Wrath of Khan (Film, 1982)
The engine room of the Enterprise seen in Star Trek II: The Wrath of Khan was the same set seen in the previous film, Star Trek: The Motion Picture, which utilized both a “forced perspective” design and scenic background paintings to make the set appear much larger than the available space on the soundstage would allow. For Wrath of Khan, rented computer props were added to the outer perimeter of the room in order to satisfy director Nicholas Meyer’s desire to have more blinking lights, and a large emergency drop-down isolation door was added between the regular and forced perspective portions of the set to be used in the film’s dramatic battle-damage scene. The most notable change to the set was the addition of the reactor room in one corner of the room, in which Captain Spock's dramatic sacrifice and death would take place. This small room utilized both new wall panels and existing wall panels that were originally constructed for use in the Klingon battle cruiser bridge set from the previous film. These wall panels would go on to be used in several other sets in future Star Trek productions.